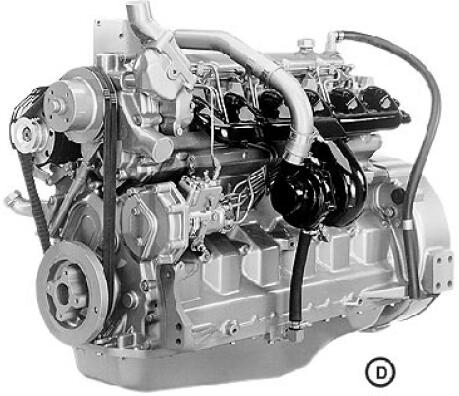
详细描述
John Deere约翰迪尔强鹿柴油机冷却、进气、排气系统的检测
1. Remove trash that has accumulated on or near
radiator.
2. Visually inspect entire cooling system and all
components for leaks or damage. Repair or replace as
necessary.
3. Inspect radiator hoses for signs of leakage or rot.
Replace hoses as necessary.
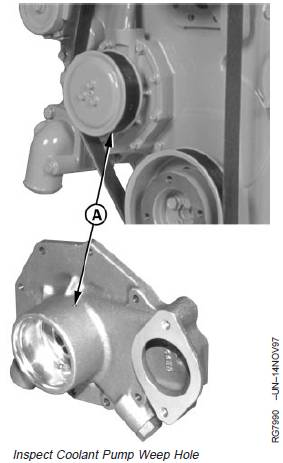
4. Inspect the coolant pump weep hole (A) for any
restrictions.
5. Insert a heavy gauge wire deep into weep hole to
make sure hole is open.
A—Weep Holes
CAUTION: Do not drain coolant until it has
cooled below operating temperature. Always
loosen block drain valve slowly to relieve any
excess pressure.
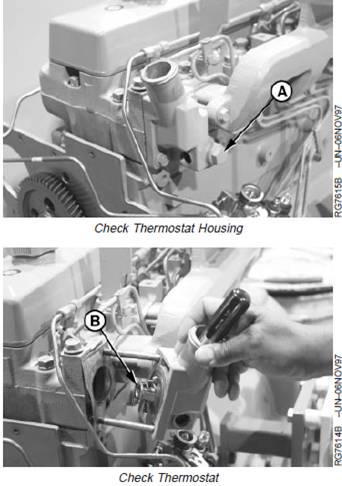
6. Remove and check thermostat(s) (B). (See TEST
THERMOSTATS in Section 02, Group 070.)
IMPORTANT: Whenever the aluminum timing gear
cover or coolant pump are replaced, the
radiator should be completely drained
by opening the radiator petcock and
removing the lower radiator hose.
Engines are now serviced with a
coolant pump insert to decrease
cavitation. When removing the coolant
pump, inspect the coolant pump cavity
in the timing gear cover for excessive
cavitation. If engine has no coolant
pump insert, install coolant pump
insert. (See INSTALL COOLANT PUMP
in Group 070.)
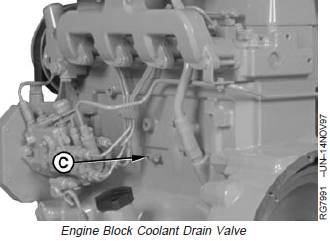
7. Drain coolant at drain valve (C) and flush cooling
system. (See FLUSH AND SERVICE COOLING
SYSTEM in Section 01, Group 002.)
IMPORTANT: Air must be expelled from cooling
system when system is refilled. Loosen
temperature sending unit fitting at rear
of cylinder head or plug in thermostat
housing (A) to allow air to escape when
filling system. Retighten fitting or plug
when all the air has been expelled.
8. Fill cooling system with recommended concentration of
coolant, clean soft water, and inhibitors. (See DIESEL
ENGINE COOLANT in Section 01, Group 002.)
9. Run engine until it reaches operating temperature.
Check entire cooling system for leaks.
A—Thermostat Housing
B—Thermostat
C—Drain Valve
10. After engine cools, check coolant level.
NOTE: Coolant level should be even with bottom of
radiator filler neck.
11. Check system for holding pressure. (See PRESSURE
TEST COOLING SYSTEM AND RADIATOR CAP in
this group.)
John Deere约翰迪尔强鹿柴油机进气系统的检查
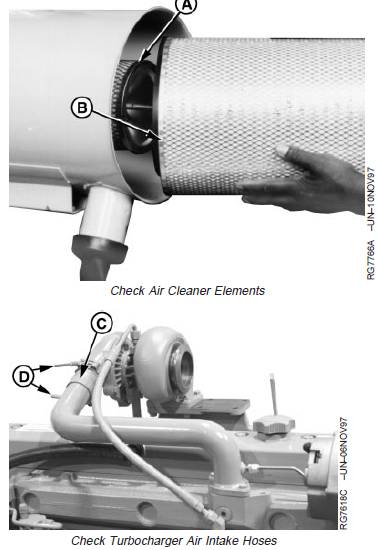
1. Replace air cleaner primary filter element (B). Replace
secondary element (A) if primary element has holes in
it.
2. Check condition of air intake hose(s) (C). Replace
hoses that are cracked, split, or otherwise in poor
condition.
3. Check hose clamps (D) for tightness. Replace clamps
that cannot be properly tightened. This will help
prevent dust from entering the air intake system which
could cause serious engine damage.
A—Secondary Filter Element
B—Primary Filter Element
C—Air Intake Hose(s)
D—Hose Clamps
Measure Intake Manifold Pressure
(Turbocharger Boost/Power Check)
This test of turbocharger boost is also a good indicator of
whether the engine is performing at full rated power.
IMPORTANT: If testing the engine with the air filter
system removed, install JDG576
Turbocharger Shield to inlet of
turbocharger.
NOTE: On “H” engines, pressure reading should be taken
at intake manifold after the aftercooler.
1. Disconnect line (A) from intake manifold and install the
appropriate fitting from JDE147 Manifold Pressure Test
Kit or FKM10002 Universal Pressure Test Kit.
Additional adapter fittings may be needed: M10 x 1
and M14 x 1.5.
Connect gauge (B) and hose assembly to fitting. Be
sure all connections are tight.
IMPORTANT: Engine speed and load should be
stabilized before taking a gauge
reading. Be sure that gauge works
properly and familiarize yourself with
the use of the gauge.
Turbo-boost pressure checks are only a
guide to determine if there is an engine
problem (valve leakage, faulty nozzles,
etc.). Low pressure readings are not a
conclusive reason for increasing
injection pump fuel delivery. Pump
adjustment should be within
specifications as established by an
authorized diesel repair station.
2. Before checking boost pressure, warm up engine to
allow the lubricating oil to reach operating temperature.
IMPORTANT: On some vehicles, it may not be
possible to meet the turbo boost
pressure due to inability to get full load
rated speed. In these cases, see
Machine Operation and Test Manual for
the appropriate test method and
pressure.
3. Place engine under full load at rated speed to make
test.
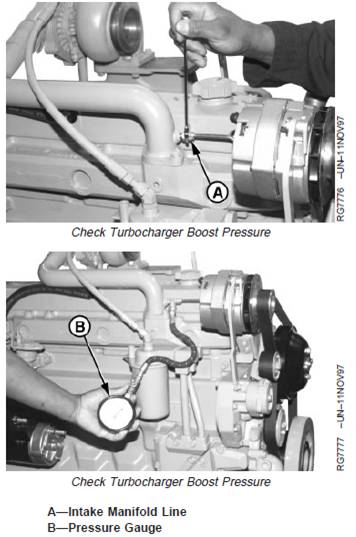
4. Observe pressure reading on gauge. Compare
readings with charts in Section 06, Group 210. Boost
pressure should be within ranges shown in charts
when engine is developing rated power at full load
rated speed.
5. If boost pressure is too high, remove fuel injection
pump and have it checked for high fuel delivery by an
authorized diesel repair station.
If boost pressure is too low, check the following:
· Restricted air filter elements.
· Restricted fuel filter elements.
· Incorrect fast idle adjustment.
· Incorrect injection pump timing.
· Exhaust manifold leaks.
· Intake manifold leaks.
· Faulty fuel transfer pump.
· Low compression pressure.
· Faulty fuel injection nozzles.
· Carbon build-up in turbocharger.
· Turbocharger compressor or turbine wheel rubbing
housing.
· Low fuel injection pump fuel delivery.
· Restricted exhaust.
6. After completing test, remove test equipment and fitting
and reconnect line to intake manifold. Tighten securely.
John Deere约翰迪尔强鹿柴油机检查进气和排气限制
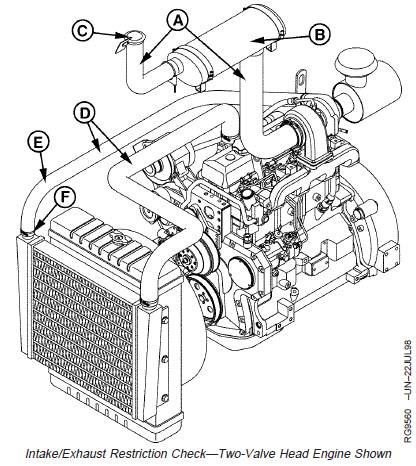
A—Exhaust Piping C—Rain Cap E—Elbow F—Connection
B—Muffler D—Intake Piping
Low power, low boost pressure, and excessive black
exhaust smoke can be caused by an intake air or
exhaust restriction.
1. Inspect the exhaust piping (A), the muffler (B), and
the rain cap (C) for damage or any possible
restrictions.
2. Inspect the intake piping (D), any elbows (E), and
any connections (F). Look for collapsed pipes,
dented pipes and loose connections. Replace
components as needed.
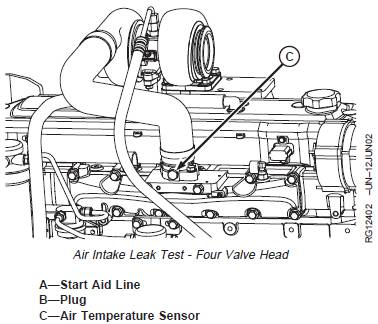
John Deere约翰迪尔强鹿柴油机进气泄漏试验
Loose connections or cracks in the suction side of the air
intake pipe can allow debris to be ingested into the engine
causing rapid wear in the cylinders. Additionally, on
turbocharged engines, compressor damage may occur
and cause an imbalance resulting in bearing failure.
Air leaking from loose connections or cracks on the
pressure side of the turbocharger can cause excessive
smoke and low power.
NOTE: The following test procedure requires that the air
intake be sealed off to pressurize the system.
Using a plastic bag to seal the air intake filter is
used as an example.
CAUTION: Do not start engine during this test
procedure. Plastic bag (or whatever
material/object used to seal intake) can be
sucked into the engine.
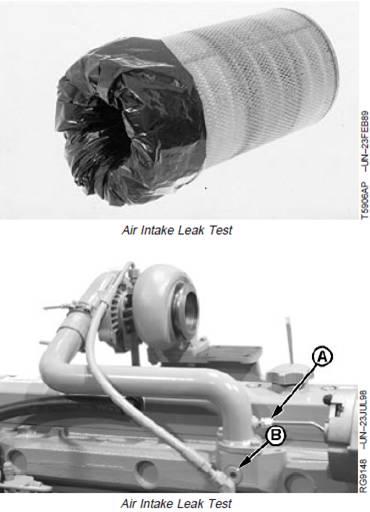
1. Remove air cleaner cover and main filter element.
2. Put a plastic bag over secondary filter element and
install main element and cover.
3. For two valve head engines, remove plug (B) from
manifold or disconnect start aid line (A) from crossover
tube (if equipped).
4. For four valve head engines, remove air temperature
sensor (C) from manifold.
5. Using a adapter, connect a regulated air source.
6. Pressurize air intake system to 13.8—20.7 kPa
(0.13-0.21 bar) (2—3 psi).
7. Spray soap and water solution over all connections
from the air cleaner to the turbocharger or air inlet to
check for leaks. Repair all leaks.
8. Remove plastic bag from filter element and reinstall
element and cover.
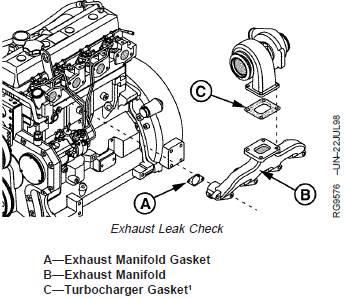
John Deere约翰迪尔强鹿柴油机检查排气漏气(涡轮增压)
Exhaust leaks, upstream of the turbocharger, will cause
the turbocharger turbine to rotate at a reduced speed
resulting in low boost pressure, low power, and excessive
black smoke.
IMPORTANT: Avoid engine damage and failure. There
are two types of gaskets: single entry
and dual entry. Single entry is
completely open in the center and dual
entry has a divider in the center. Do not
interchange dual and single entry
gaskets.
Inspect the exhaust manifold gasket (A), the exhaust
manifold (B), and the turbocharger gasket (C) for damage
and any signs of leakage. Replace components as
needed.
John Deere约翰迪尔强鹿柴油机OEM发动机技术规格
General OEM Engine Specifications
Tier I Engines
ITEM ENGINE
4045DF150 4045TF150 4045TF250 4045HF150 6068DF150 6068TF150 6068TF250 6068HF150 6068HF250
Number of Cylinders 4 4 4 4 6 6 6 6 6
Bore 106 mm 106 mm 106 mm 106 mm 106 mm 106 mm 106 mm 106 mm 106 mm
(4.19 in.) (4.19 in.) (4.19 in.) (4.19 in.) (4.19 in.) (4.19 in.) (4.19 in.) (4.19 in.) (4.19 in.)
Stroke 127 mm 127 mm 127 mm 127 mm 127 mm 127 mm 127 mm 127 mm 127 mm
(5.0 in.) (5.0 in.) (5.0 in.) (5.0 in.) (5.0 in.) (5.0 in.) (5.0 in.) (5.0 in.) (5.0 in.)
Displacement 4.5 L 4.5 L 4.5 L 4.5 L 6.8 L 6.8 L 6.8 L 6.8 L 6.8 L
(276 cu (276 cu (276 cu (276 cu (414 cu (414 cu (414 cu (414 cu (414 cu
in.) in.) in.) in.) in.) in.) in.) in.) in.)
Compression 17.6:1 17.0:1 17.0:1 17.0:1 17.6:1 17.0:1 17.0:1 17.0:1 17.0:1
Max. Crank Pressure 0.5 kPa 0.5 kPa 0.5 kPa 0.5 kPa 0.5 kPa 0.5 kPa 0.5 kPa 0.5 kPa 0.5 kPa
(2 H2O) (2 H2O) (2 H2O) (2 H2O) (2 H2O) (2 H2O) 2 H2O) (2 H2O) (2 H2O)
Governor Regulation 7—10 % 7—10 % 7—10 % 7—10 % 7—10 % 7—10 % 7—10 % 7—10 % 7—10 %
(Industrial)
Governor Regulation 5 % 5 % 5 % 5 % 5 % 5 % 5 % 5 % 5 %
(Generator)
Oil Pressure Rated 345 kPa 345 kPa 345 kPa 345 kPa 345 kPa 345 kPa 345 kPa 345 kPa 345 kPa
Speed (50 psi) (50 psi) (50 psi) (50 psi) (50 psi) (50 psi) (50 psi) (50 psi) (50 psi)
Oil Pressure Low Idle 105 kPa 105 kPa 105 kPa 105 kPa 105 kPa 105 kPa 105 kPa 105 kPa 105 kPa
(15 psi) (15 psi) (15 psi) (15 psi) (15 psi) (15 psi) (15 psi) (15 psi) (15 psi)
Length 861.0 mm 861.0 mm 861.0 mm 861.0 mm 1117 mm 1117 mm 1117 mm 1116 mm 1141 mm
(33.9 in.) (33.9 in.) (33.9 in.) (33.9 in.) (44.0 in.) (44.0 in.) (44.0 in.) (43.9 in.) (44.9 in.)
Width 598 mm 598 mm 598 mm 598 mm 598 mm 598 mm 598 mm 623 mm 623 mm
(23.5 in.) (23.5 in.) (23.5 in.) (23.5 in.) (23.5 in.) (23.5 in.) (23.5 in.) (24.5 in.) (24.5 in.)
Height 854 mm 980 mm 980 mm 980 mm 956 mm 984 mm 984 mm 1009 mm 1009 mm
(33.6 in.) (38.6 in.) (38.6 in.) (38.6 in.) (37.6 in.) (38.7 in.) (38.7 in.) (39.7 in.) (39.7 in.)
Weight 387 kg 396 kg 396 kg 396 kg 522 kg 533 kg 533 kg 550 kg 568 kg
(851 lb) (872 lb) (872 lb) (872 lb) (1149 lb) (1172 lb) (1172 lb) (1210 lb) (1250 lb)

 English
 Espaol
 Franais
 阿拉伯
阿拉伯 中文
中文 Deutsch
 Italiano
 Português
 日本
日本 韩国
韩国 български
 hrvatski
 esky
esky Dansk
Dansk Nederlands
 suomi
suomi Ελληνικ
 印度
印度 norsk
norsk Polski
 Roman
Roman русский
 Svenska
